OpenClaw Security: 12 Best Practices From Our Experts
 William Imoh
OpenClaw needs broad system access to work, and that same access is what makes a weak setup a target. In my experience, users who encounter serious issues with OpenClaw aren't being careless. They just installed it, assumed the defaults were safe, and never bothered to go back and set any limits. By that point, the agent already had access to credentials like SSH keys and API tokens. To reduce risk, you need to understand what the OpenClaw agent can access on your system. If you don't set clear limits, the agent could end up accessing more than you bargained for.
When setting it up, be careful, as this level of control poses significant security issues. If something goes wrong due to a malicious skill, a prompt injection, or a weak setup, it can affect your system. These risks should not stop you from using OpenClaw, but rather, use them as a reason to control how you set it up. Most issues come from poor setup choices (e.g., default configs, open gateways), not the tool itself.
In this guide, I'll explain the OpenClaw threat model and provide 12 best practices to keep your data safe. I'll cover everything from network configuration and gateway security to supply chain risks. If you're already using OpenClaw or considering it, this is the place to start.
TL;DR:
If you are new to OpenClaw or want to take your setup further, the OpenClaw roadmap gives you a clear path forward. The following is a summary table of the 12 OpenClaw security practices I put together for you to follow. Use this as your security checklist and come back to it every time your setup changes.
# | Practice | One-line rule |
1 | Don't run on your primary machine | Never install OpenClaw on your primary work or personal machine |
2 | Use a dedicated device identity | Use a dedicated Apple ID, Google account, and API keys for OpenClaw. Do not share any of them with your main accounts. |
3 | Bind the gateway to localhost and enable auth | Bind to 127.0.0.1, enable gateway auth, and keep it off the public internet |
4 | Apply firewall rules and use non-default ports | Block the default port, apply firewall rules, and keep the gateway port off the internet. |
5 | Use scoped, least-privilege API tokens | Scoped tokens only. Give the agent the minimum access it needs and nothing more. |
6 |
| Never hardcode API keys. Use environment variables, set file permissions to 600, and rotate on a schedule. |
7 | Restrict OpenClaw filesystem access | Restrict what paths OpenClaw can read and write. Deny sensitive directories explicitly |
8 | Enable consent mode for destructive commands | Enable consent mode for irreversible commands. Block destructive commands by default |
9 | Vet every skill before installing | Every skill is untrusted input until you read and verify it yourself. Never install from sources you do not trust. |
10 | Protect Soul Docs from tampering | Treat your agent's identity config as a security surface, not just a preference file |
11 | Update OpenClaw Often | Never run a stale install. Check for updates after every major release and patch without delay. |
12 | Monitor and audit quarterly | Log unusual activity. Audit skills quarterly. Review after every major update |
The table above summarizes what good OpenClaw practice looks like. The rest of this guide will walk you through each practice, starting with the risks that make them matter.
The threat model: What you're actually protecting against
OpenClaw is an open-source AI agent that runs commands and modifies files on your computer. With this access, the agent can install packages and run shell commands on your system. When you install OpenClaw, you're not just adding a tool to your workflow. You're running an AI agent that can act on your behalf with the same permissions you give it. It can read sensitive data, write files, call APIs, and interact with messaging apps like Slack, WhatsApp, and Discord.
The AI security tips in this guide are not just random recommendations. Each one fixes a weakness that security researchers found in OpenClaw deployments.
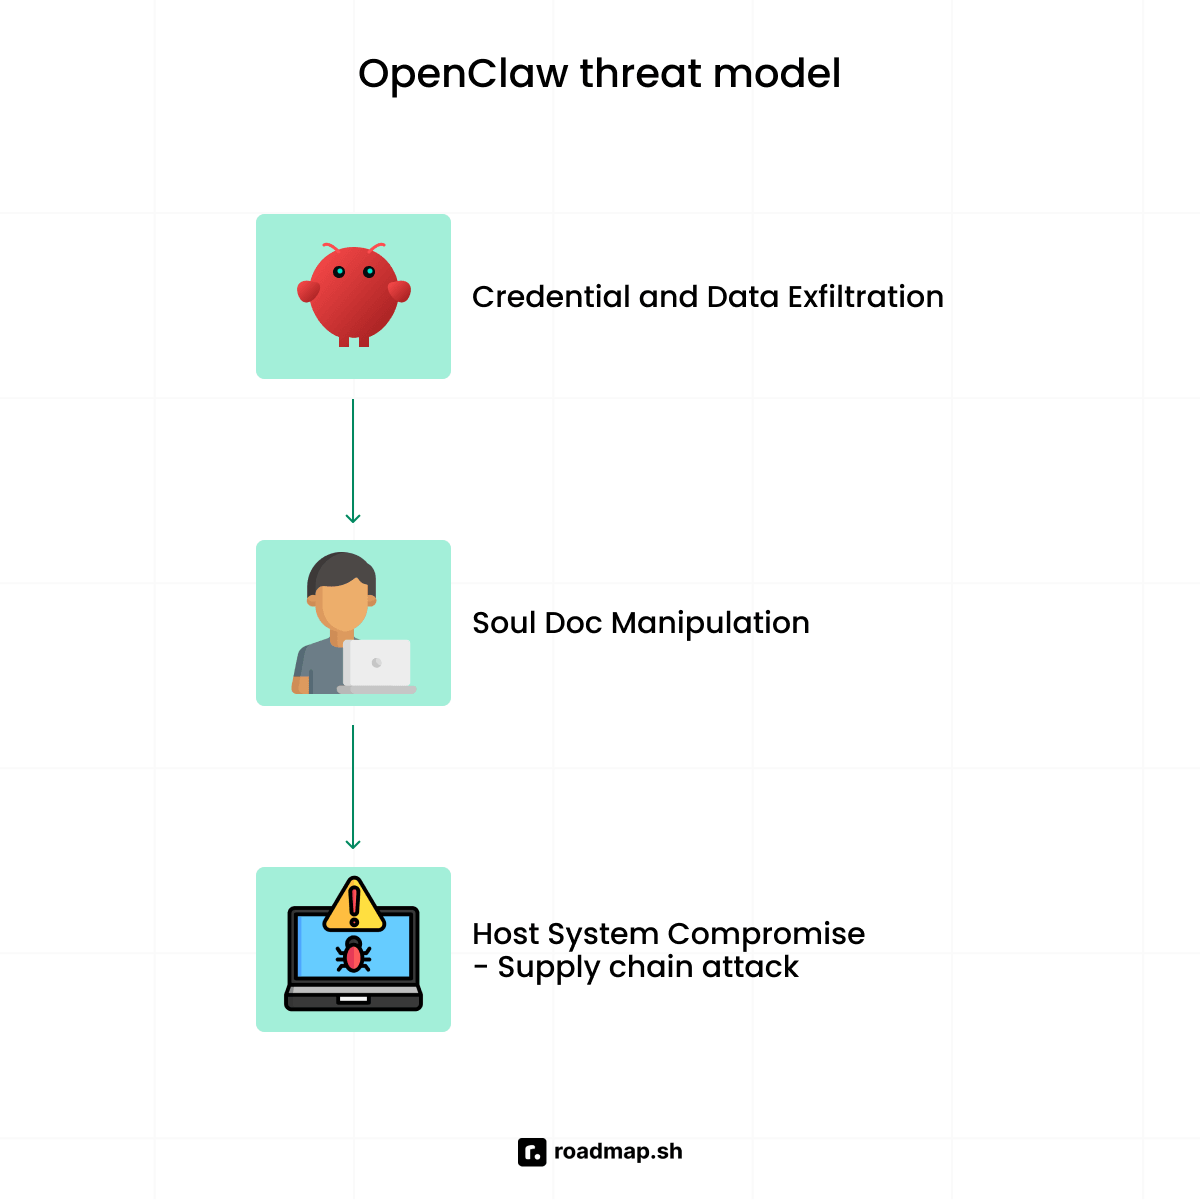
Let's look at the 4 threats that make the best practices covered in this guide worth following:
Credential and data exfiltration
A core risk of OpenClaw access is the exfiltration of credentials and data. The AI agent can access API keys, environment variables, and your file system. If a malicious skill or prompt injection succeeds, it gives threat actors (i.e., attackers) a direct path to sensitive data, such as your .env file.
Once they have access, the agent can send your credentials to external servers. That is how leaking API keys starts, and it often comes from setups with no clear security controls in place.
Memory and Soul Doc manipulation
Your OpenClaw agent gets its identity, values, and instructions from Soul Docs. These Soul Docs files govern how the AI agent behaves across every session. It controls the agent's responses, the tools it uses, the topics it skips, and the way it treats everyone it talks to. However, a threat actor who can modify these files can add malicious instructions to the AI agent.
The AI agent will follow these instructions in every session, and you'll see no sign of any change. You'll keep using the agent, but it follows someone else’s rules and acts the way they want, without warning you.
Supply chain attacks via ClawHub
Supply chain attacks on OpenClaw can come from third-party tools such as Google Calendar connectors. Every skill you install brings in outside code and expands your attack surface (i.e., attack entry points). The fact that ClawHub publishes a skill does not make it safe. Treat every skill as untrusted code until you install it, as ClawHub is a registry, not a security review.
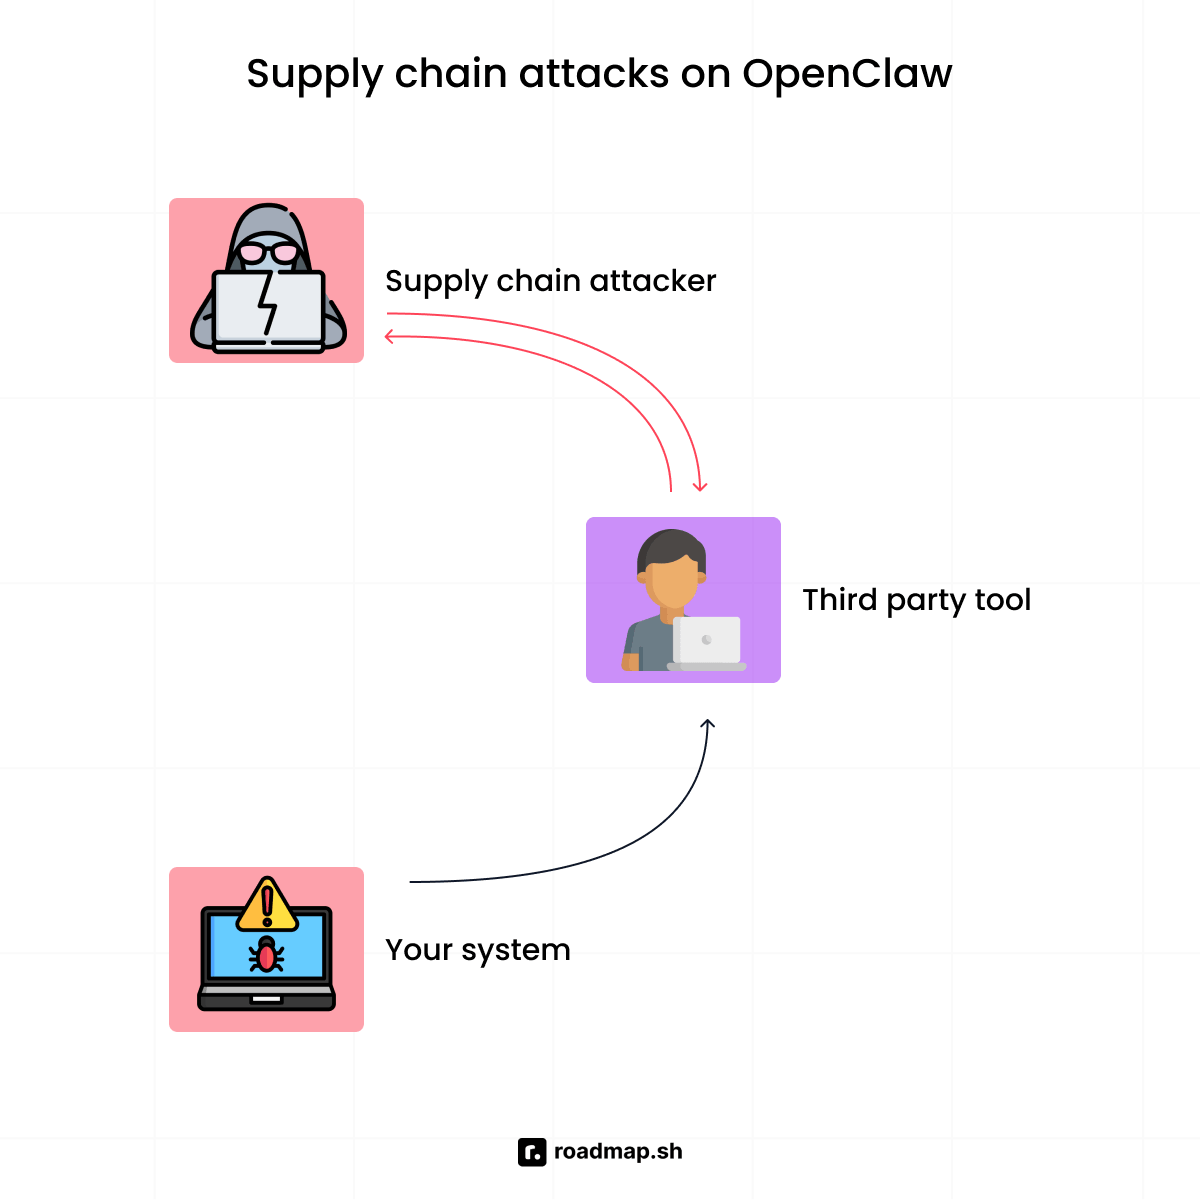
OpenClaw instances without clear skill boundaries are the ones attackers target. A malicious skill can hide harmful instructions in its SKILL.md file and push the agent to read data, change configs, or run hidden commands. Threat actors also hide fake setup steps inside skills to push the agent into doing things you never asked for.
Host system compromise via the AI agent
Once you set up OpenClaw, it can run shell commands and execute code without prompting you each time. The agent treats high-risk commands like rm -rf, the same way it treats harmless commands like ls. It runs each command without checking with you first unless consent mode is on. That level of access becomes an issue when a malicious instruction takes hold of your system. One bad input, through a message, a skill, or external data, can grant full system access.
The Clinejection attack on February 9, 2026, is the clearest example of this risk in practice. Security researcher Adnan Khan found an indirect prompt-injection vulnerability in the Cline repository. A threat actor hid malicious instructions inside a GitHub issue title, and an AI triage bot read it and treated it as a valid instruction. That gave the attacker Remote Code Execution (RCE) on the GitHub Actions runner. They used that access to steal production secrets and push malicious updates to around 4,000 developer systems. If cases like this make you think about wider AI security risks, the Cyber Security Expert roadmap explains the full landscape.
Security by setup: How the practices apply differently
The 12 practices in this security guide cover every OpenClaw agent setup. But how you use them depends on where you deploy OpenClaw. For example, a laptop install, a dedicated Mac Mini, and a VPS each have different attack surfaces and need different priorities. Check out our dedicated guide to learn more about the different ways to install OpenClaw.

The table below shows how priorities differ for a laptop, a dedicated Mac Mini, and a VPS:
Feature | Personal laptop | Dedicated device | VPS / cloud |
|---|---|---|---|
Biggest risk | Daily files & credentials exposed | Physical access; weak config | Public IP reachable by anyone |
Top priority | Filesystem scoping | Sleep settings + dedicated ID | UFW + gateway binding first |
Isolation | Low — shared OS | High — separate machine | High — cloud instance |
Networking | Localhost only | Localhost; VPN for remote | UFW + Nginx reverse proxy |
Credentials |
| Same as laptop + hardware key | Env vars; no plain-text files |
Updates | Manual | Manual | Can automate |
Monitoring | Basic log review | Basic log review | Structured logs + IDS |
The following is a breakdown of how you can keep your data safe in these three setups:
Laptop users
The most important thing you can do as a laptop user is to scope the file system and use a dedicated device identity. Your laptop holds your files, browser sessions, and financial data all in one place. This makes it the highest-risk environment for a personal AI assistant like OpenClaw. If you deploy OpenClaw on your laptop, treat it as a temporary setup and move to a dedicated device when you can.
Dedicated device users
When you deploy OpenClaw on a dedicated device (Mac mini or Raspberry Pi), focus on the physical configuration. Use a clean OS install and reserve the machine for OpenClaw so it does not mix with your daily accounts or data. Create a new Apple ID or account just for OpenClaw, and don't use the same login info as your personal devices. Also, configure sleep and lock settings so the device does not expose open sessions to anyone with physical access.
Virtual Private Server (VPS) users
When you deploy OpenClaw on a VPS, your gateway carries a routable IP address that threat actors can find and scan. Network isolation is your first line of defense, and every security control you put in place builds on top of it. Bind the gateway to localhost, limit network interfaces, and apply firewall rules. Confirm port 18789 is not open to the public internet, and place external access behind a reverse proxy with authentication.
Security researchers found tens of thousands of OpenClaw instances exposed online. Most came from weak network controls that users never changed from the default setup.
Category A: Isolation, where you run OpenClaw matters most
When installing your OpenClaw agent, where you run it matters more than how you configure it. OpenClaw's security model assumes one trusted operator and leaves everything else unguarded. It builds no protection against shared machines, compromised environments, or untrusted users. If your environment is not secure, the AI agent will not be either.
Practice 1: Never run OpenClaw on your primary machine
The first thing I look at on any new OpenClaw install is what the machine can access and what it holds. A good setup means little if the machine holds your main accounts, work files, and personal data. Don't use OpenClaw on the same system you use for banking, email, or work. The agent has the same permissions and file system access you grant on your computer. If it receives a malicious instruction through prompt injection, it can put more than the AI agent at risk. It can expose files, credentials, source code, SSH keys, and even your financial data.
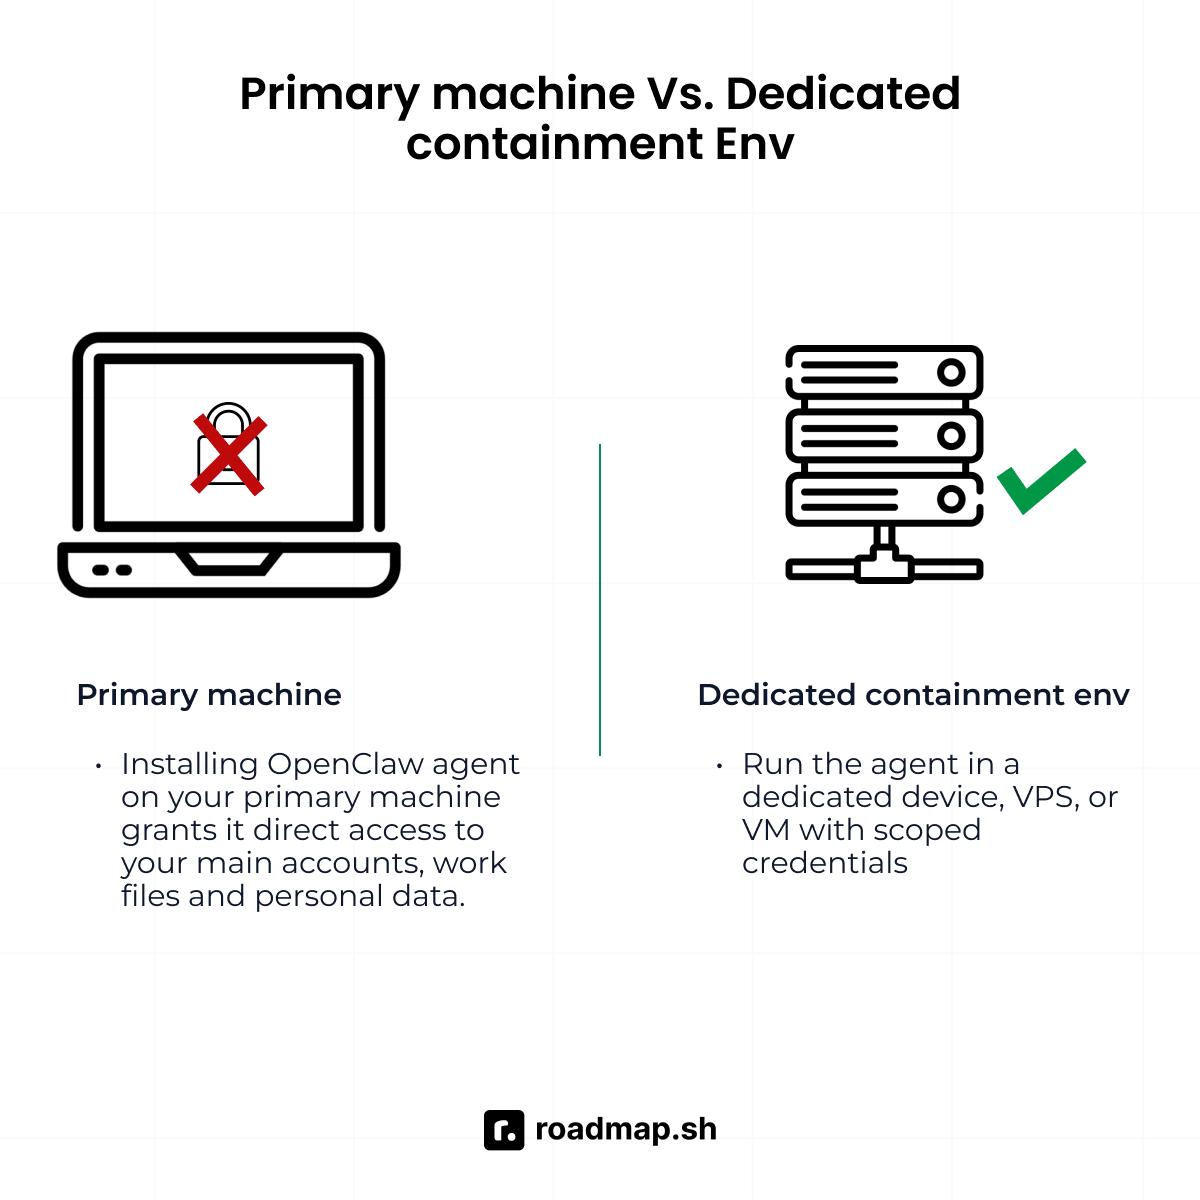
Your main machine has too much trust to be part of the agent's attack surface. It's better to run OpenClaw in a contained environment instead. Use a dedicated device, VPS, or VM to reduce blast radius, i.e., the damage scope if something goes wrong. Good isolation does not remove the risk, but it keeps it from spreading to everything you own.
The following are four ways to run OpenClaw, each with a different cost and isolation level:
Setup | Cost | Isolation level | Best for |
Dedicated Mac Mini or spare PC | One-time hardware cost | High, physically separate | Always-on personal AI agents |
VPS (e.g., Hetzner, Railway, DigitalOcean) | ~$5-15/month | High, fully isolated cloud instance | Remote access, Teams |
Local VM (UTM on macOS, VirtualBox on Windows/Linux) | Free | Medium, container isolation, shared hardware | Testing, experimentation |
Docker container (hardened) | Free | Medium, process isolation, shared OS kernel | Developer environments |
Practice 2: Use a dedicated identity for everything OpenClaw touches
Do not connect the OpenClaw agent to the same accounts you use for your personal or work life. From my experience, I recommend using separate accounts and credentials for anything the AI agent can access.
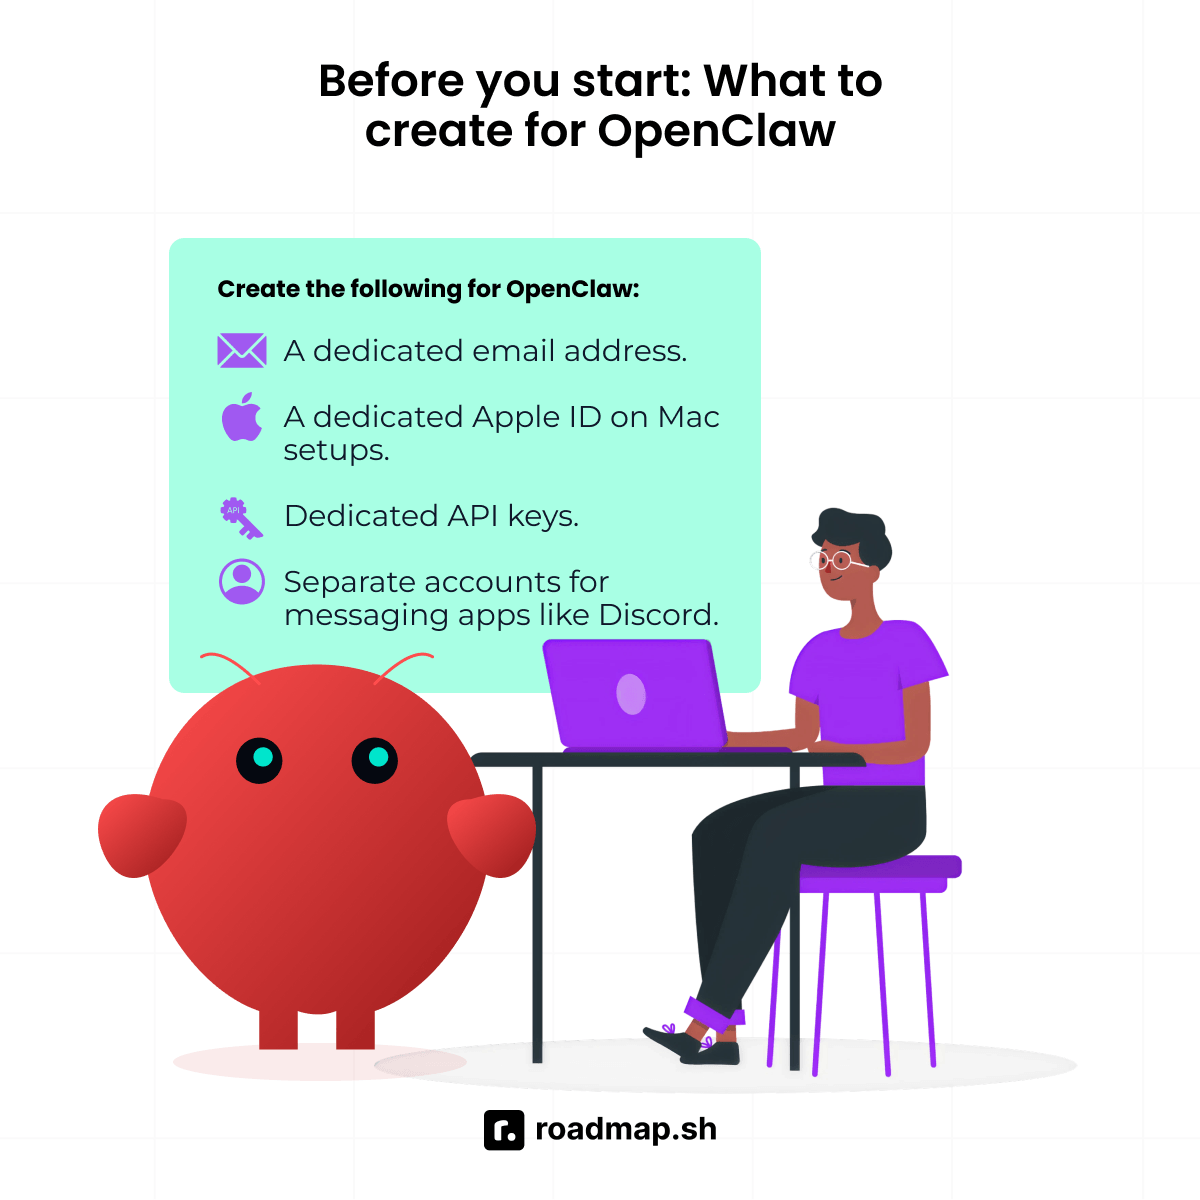
Create the following for OpenClaw:
A dedicated email address.
A dedicated Apple ID on Mac setups.
Dedicated Anthropic/OpenAI/Google keys. It should be separate from any key used in production systems.
Separate accounts for messaging apps like Discord and WhatsApp, if the agent manages those channels.
If the agent connects to your main accounts, a single compromise can spread outside the agent. The security implications can extend to your finances, your work, and the rest of your system.
Category B: Network and gateway security
The OpenClaw gateway runs on your computer by default, which keeps it off the public internet. Most issues start when users make it reachable from the internet and leave gateway auth off, or run a reverse proxy with the wrong configuration. Security experts connect most exposed OpenClaw instances to those two gaps.
Practice 3: Bind the gateway to localhost and enable auth
The OpenClaw gateway is often the first target of attacks, especially when it's left unprotected on the internet. When configuring gateway security, bind the gateway host to 127.0.0.1 rather than 0.0.0.0. Use a password (gateway auth) so every connection needs credentials, even from your system. A secure context means the gateway listens on an address that nothing outside the host can reach.
CVE-2026-25253 is a Remote Code Execution (RCE) vulnerability that proves even the gateway running on your own machine is not safe. This flaw gave an attacker a way to turn the user's own browser against them, using it to reach the local gateway and steal the device identity token. That token gave the attacker full operator access without any additional credentials. Gateway Auth helps prevent that risk by requiring credentials before users gain access.
I'll advise VPS users who need outside access to never expose the gateway or port 18789 to the internet without a shield in place. Put Nginx in front as a reverse proxy to handle outside traffic. Use SSL to keep that traffic encrypted, and add HTTP Basic Auth so the gateway stays behind a login wall.
Practice 4: Apply firewall rules and use non-default ports
Weak network security controls expose more OpenClaw instances than any other software flaw. Security researchers link many exposed instances to open ports and weak firewall rules. One popular target is port 18789, which is the default gateway port for OpenClaw.
Threat actors target this port because they know many users forget to secure it. My first OpenClaw setup was a familiar story: install it, leave everything at default, and move on. The system used port 18789, had no gateway auth in place, and no firewall rules to control access. Within less than 48 hrs, the logs showed multiple probe requests from unknown IPs. Nothing breached the system, but it showed how exposed my setup was.
It's important to change the port from 18789 to a non-standard port that threat actors do not scan for. When you change the port, pair it with gateway auth and firewall rules, as that change alone isn't enough to protect your deployment. Every secure setup needs these controls:
Allow only SSH you trust.
Allow HTTPS only through your reverse proxy.
Block direct access to port 18789.
Review open ports after each configuration change.
The first change happens inside your OpenClaw config, not your firewall. Start by changing the port in your OpenClaw config from Port 18789 to a non-standard port. A different port keeps attackers from finding your gateway through automated scanning.
If your setup uses a YAML config file instead of environment variables, add the port change there:
The config change and the firewall rules work together. The config tells OpenClaw which port to use, while the firewall rules block the old port and secure the new one. You need both for the change to actually work.
Replace 18790 with the port you selected in your OpenClaw config. Make sure the port number in your config matches the one in your firewall rules. If they don't match, your firewall will block the wrong port, leaving your gateway vulnerable on the right one.
Also, UFW INPUT rules are not enough for users who deploy OpenClaw inside Docker on a VPS. Docker inserts its own iptables rules and bypasses UFW, leaving the gateway port exposed even when your UFW config looks correct. The gap does not appear in your UFW rule list. Start by finding your primary network interface before writing any rules:
In the output, you'll see the interface name appear after "dev." You'll usually see names like eth0, ens3, or enp0s3. The rules below don't specify the interface name and cover all interfaces regardless of name.
A rule without an interface specifier blocks the port on all interfaces on your VPS. One that targets -i eth0 only works on eth0. If your VPS uses a different interface name, the rule will miss all traffic on that interface. The rules above leave the specifier out for that reason.
This rule does not survive a reboot on its own. Use iptables-persistent to save it and keep it active after every restart:
Category C: Credentials and API key safety
OpenClaw depends on API keys to access the tools and services it uses. The way you store and limit those keys affects what an attacker can access if a compromise occurs. Leaking API keys is one of the most common results of a successful attack, and the right setup is what prevents it.
Practice 5: Use scoped, least-privilege API tokens
Every token OpenClaw holds carries risk, as each extends the AI agent's access. If one leaks, the scope determines whether you lose access to one service or an entire account. Give OpenClaw the narrowest credentials that still cover the tasks you assign.
Use dedicated OpenClaw keys rather than reusing keys tied to your main accounts. If a task does not need the AI agent to write or modify data, use read-only keys scoped to that service. Based on my past experience, I recommend limiting storage keys to a single folder or bucket and using separate SSH keys for agent tasks.
Never use admin credentials, root-level tokens, or primary SSH keys for OpenClaw tasks. One stolen key from that group gives an attacker full control of everything tied to that account. Security hardening starts with a tight credential scope, which helps contain a breach. One scoped token with limited access is a problem you can recover from. However, a leaked admin key can lead to full account takeover.
Credential | Do | Don't |
Anthropic/OpenAI API key | Create a dedicated key for OpenClaw only | Reuse your production app key |
Cloud storage tokens | Scope to a specific bucket or folder | Grant full storage admin access |
Email/calendar access | Grant only the calendars/labels OpenClaw needs | Connect your primary inbox |
SSH keys | Use a passphrase-protected key scoped to specific hosts | Give OpenClaw your primary ~/.ssh/id_rsa |
Practice 6: Store secrets properly and rotate regularly
Many AI security failures begin with weak secret storage, not with complex attacks such as prompt injection or supply chain. If you're storing keys in config files, scripts, or repos, you might expose sensitive info. Don't put API keys in files that could end up in a shared Git repository, even if they're supposed to be private. Threat actors often use bots to search for exposed secrets in repos, so treat any key in a commit as compromised.
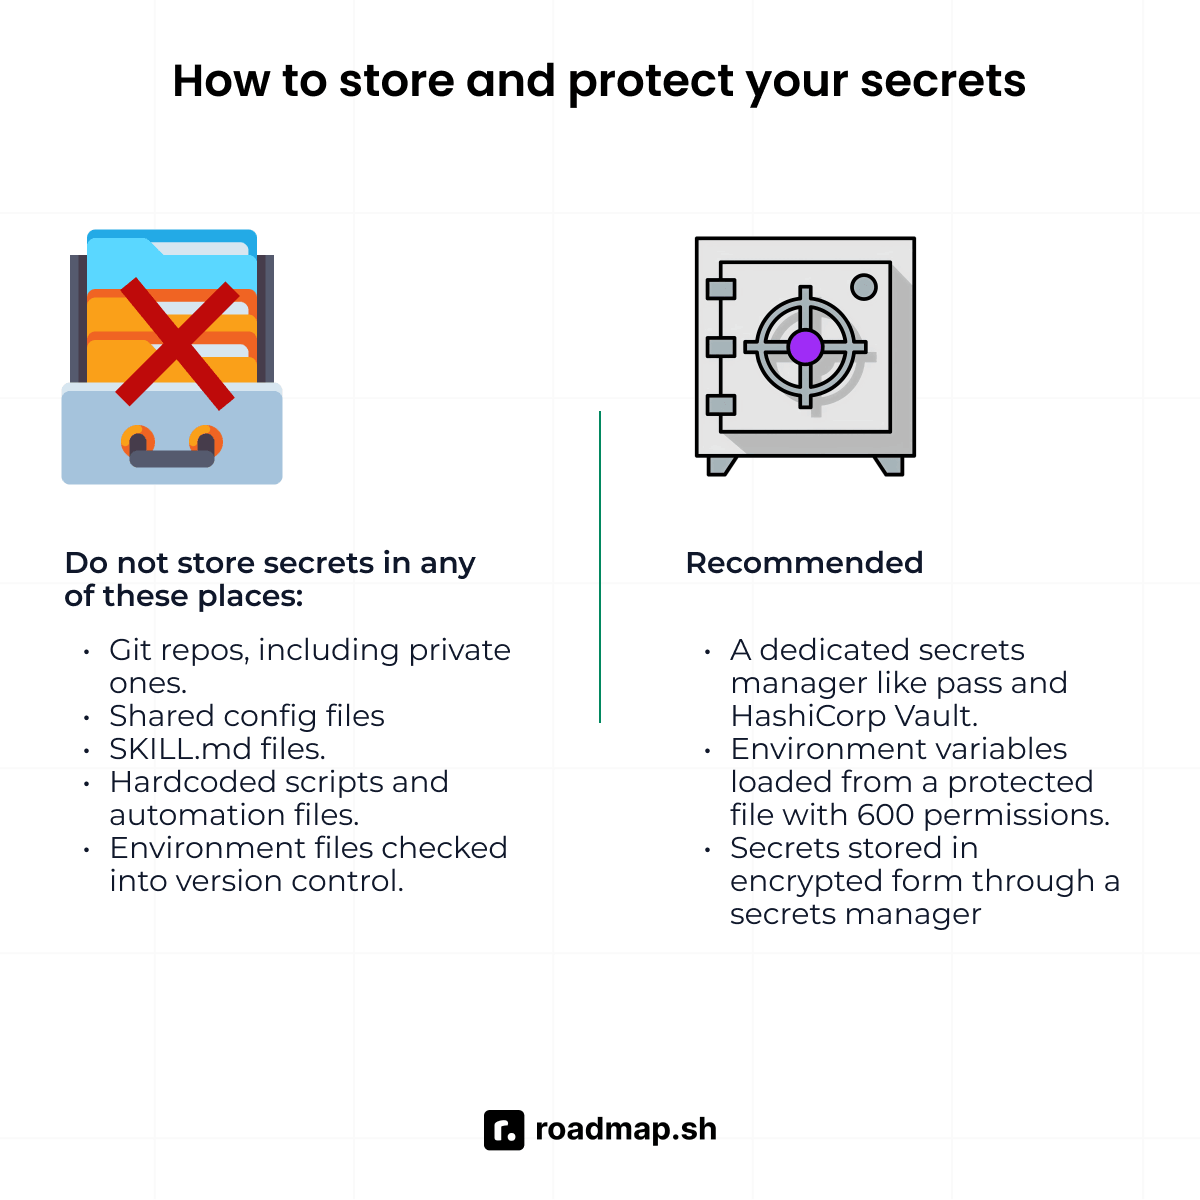
Do not store secrets in any of these places:
Git repos, including private ones.
Shared config files that other users or services can read
Skill files and SKILL.md files
Hardcoded scripts and automation files
Environment files checked into version control
The safest way to store OpenClaw secrets is through a dedicated secrets manager or environment variables. Tools like pass, 1Password CLI, and HashiCorp Vault store secrets in encrypted form. They inject them into your environment on demand without writing anything to disk. Use any of the tools if your setup allows it.
If you cannot use a secrets manager, a file-based approach works, but only with the right controls in place. Set file permissions to 600 on any .env file, so no other user on the same machine can read it. Also, if you load secrets with $(cat file), it exposes the secret through /proc/<pid>/environ on Linux systems. It's better than hardcoding, but not as secure as a secrets manager. Use it as a temporary measure, not a long-term solution.
HISTIGNORE and HISTCONTROL reduce the chance of secrets appearing in your shell history, but don't remove them. HISTIGNORE only blocks commands that start with export LLM. Inline assignments like LLM_API_KEY=value some_command, and variable references, all bypass it. HISTCONTROL=ignorespace adds manual control through the space prefix, but it depends on you remembering to use it every time. However, neither method stops the value from appearing in your process environment. Treat both as a starting point, but consider using a secrets manager for better security.
Don't wait for a breach; set up a token rotation schedule (at least every 90 days) and follow it. If a token may have leaked, assume it has and rotate it at once. It's better to check your API provider's usage dashboard once a week and whenever you make any big changes to your setup. An increase in usage you did not cause often indicates that your token has leaked and someone else is using it.
Category D: Filesystem and shell access hardening
OpenClaw can execute scripts, write files, and run shell commands on the file system. That level of access gives mistakes or bad instructions more ways to do damage. If a malicious skill, a prompt injection in an email, or a fake web page delivers a bad instruction, it can lead to full system access. Limiting what the AI agent can touch limits the damage it can cause to your system.
Practice 7: Restrict OpenClaw filesystem access
Block the OpenClaw AI agent from reaching directories it does not need for the tasks you give it. If it doesn't need your SSH keys, browser profiles, or system files, those paths should be off limits.
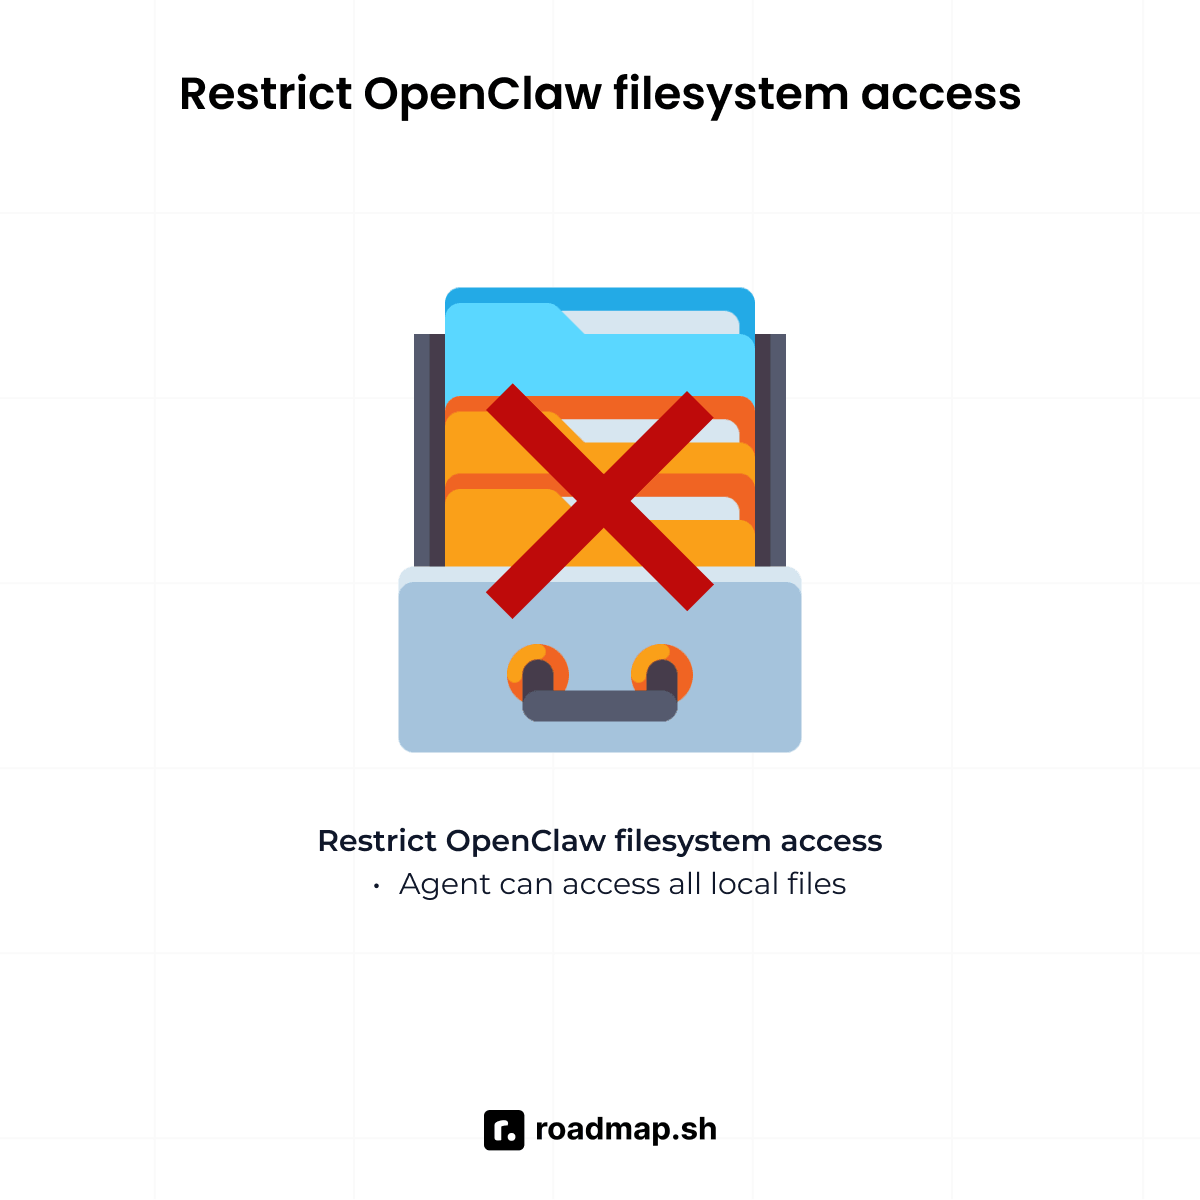
Without filesystem access limits, a malicious skill or prompt injection attack has a clear path to the files on your system. That path can lead to files like ~/.ssh/id_rsa, environment files, and browser session data. Strict deny rules are what block that path and define what the AI agent can and cannot reach.
In the example above, the config keeps your most sensitive paths out of reach for the OpenClaw AI agent. It blocks access to SSH keys, environment files, system password files, and more. Add any path you want the agent to avoid on this list, and it will not be able to touch it.
Also, the ~/.env only blocks a .env file at the root of your home directory. Most projects store .env files inside project folders, which ~/.env does not cover. The **/.env pattern blocks all .env files across your filesystem, no matter where they are. Use it instead to cover .env files in project folders too.
Practice 8: Enable consent mode for destructive commands
Some commands can cause damage that you cannot reverse once it runs on your system. From experience, it's important to turn on consent mode so those commands and high-risk tools stop for your approval before they run. A single bad prompt is enough to make OpenClaw execute code like rm -rf if those commands have no approval gate.
Without controls in place, OpenClaw has no way to tell a safe command from a destructive one. You need hard controls to decide what the agent can run and what it must avoid. Strong system prompts may guide the AI agent, but they cannot set limits.
In the example above, the config file specifies which actions require your approval before they run. Put any action that can cause damage you cannot reverse on this list, so OpenClaw cannot run it without your say.
Category E: Skills safety, the ClawHub supply chain risk
Supply chain attacks through ClawHub pose a real threat to OpenClaw users. In February 2026, Snyk security researchers scanned ClawHub and found a malware campaign with over 30 malicious registry keys.
Attackers hid harmful instructions inside SKILL.md files. The agent read and followed these orders during setup. That number is what researchers confirmed in a single scan; many more are likely hidden. The actual count of bad skills in any registry is often larger. Use this as a reason to check every skill before you hit install.
Practice 9: Vet every skill before installing
Skills are third-party packages that OpenClaw runs as trusted code with full access to your system. They can extend what the agent can do, but they can also introduce risk if you do not review before installing. A single skill can run actions, access data, and interact with parts of your system you didn't expect.
Don't rely on surface signals such as popularity or quick setup steps when installing a skill. Safety doesn't come from how many people use a skill, as attackers can raise those numbers to make a skill look safe. Some skills include hidden instructions in SKILL.md files that the agent may follow without warning you. So, read the code, check the source, and make sure you trust the publisher before you install anything.
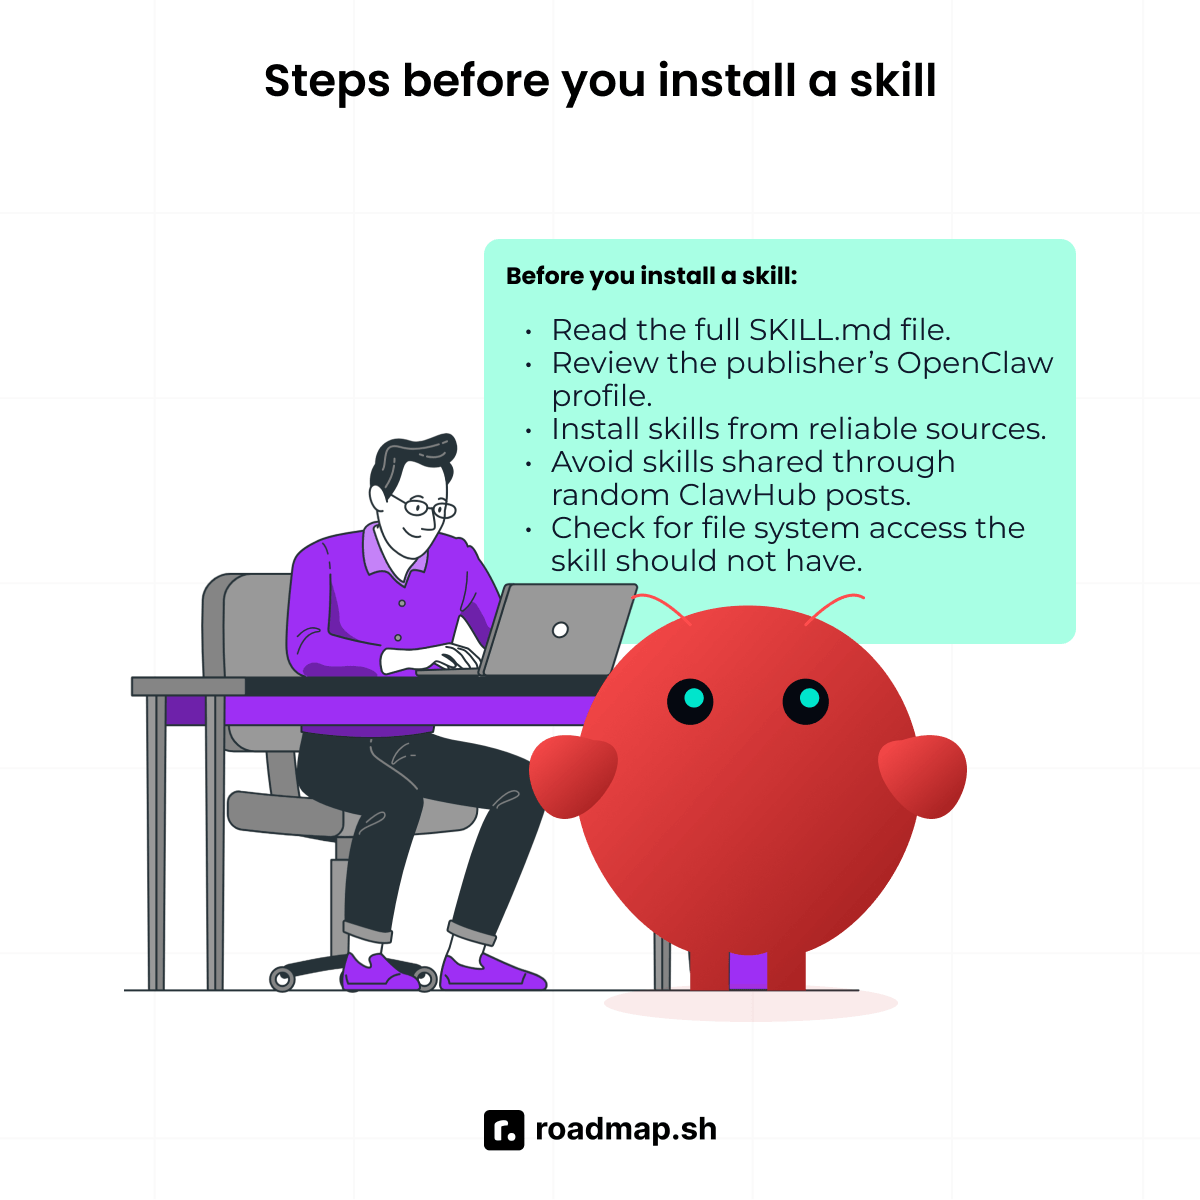
Before you install a skill, check the basics:
Read the full SKILL.md file to review what permissions it needs.
Review the publisher’s profile and other skills they have published on ClawHub.
Install skills from reliable sources such as official websites and trusted communities. Avoid skills shared through Discord messages, Reddit comments, or other random ClawHub posts.
Check for network calls or file system access, the skill should not have.
Practice 10: Protect your Soul Docs from tampering
Soul Docs are the files that guide the agent's thinking, actions, and task handling. They set the rules and patterns that the OpenClaw agent follows in its everyday use. So, they're part of your security boundary, not just a configuration file you set once and forget.
A threat actor who gets access to your Soul Docs does not need to breach anything else to take control of the agent. It attacks your system in a way that won't trigger alerts, unlike a credential leak or a file deletion. They can change how the agent thinks, what it trusts, and what it does on your behalf. It might not seem like a breach at first, but it can lead to some serious damage before you even realize it.
How to protect Soul Docs:
Keeping backups outside the OpenClaw data directory (e.g., in a private git repo).
Using version control so every change leaves a record you can review.
Never give a skill write access to your Soul Docs.
Reviewing changes at the start of each week or after a strange agent behavior.
Treat any change you did not make as a sign of compromise.
Restrict write access to Soul Doc files so only you can change them.
Category F: Keeping OpenClaw updated and monitored
An outdated self-hosted OpenClaw install is a common target for attackers. CVE-2026-25253 RCE proves why keeping OpenClaw up to date matters. It's a one-click exploit that results in full authentication bypass.
This flaw works through the Control UI gatewayUrl parameter to take control of a machine if a victim clicks a malicious link. It was a big problem for exposed instances on older gateway versions before most users had a patch. If you're still running a version before 2026.1.30, your deployment remains at risk. The same risk applies across corporate systems and personal deployments that remain unpatched.
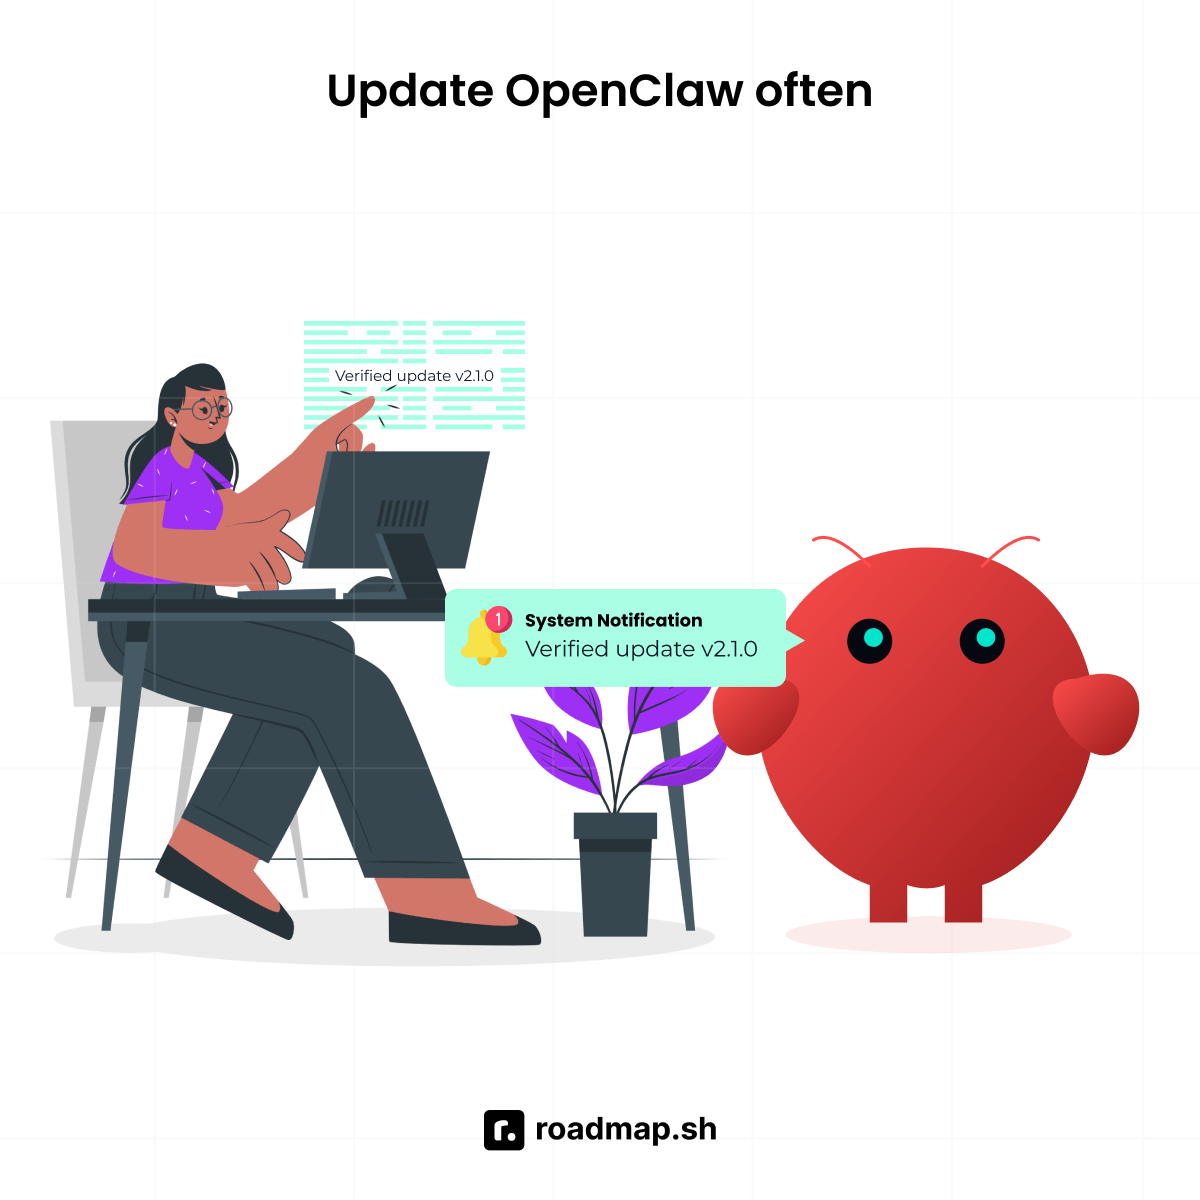
Practice 11: Update OpenClaw often
Check for new releases and updates to avoid using outdated versions. It's not a good idea to keep using an old installation for too long, even with strong security measures in place. Old versions attract known attacks, and many target flaws that updates already fix.
Most security updates do not add new features when installed. They close paths that attackers have found, tested, and used to gain access to systems. CVE-2026-25253 is a clear example of what happens when those paths stay open. It hit unpatched installs before most users updated their systems. Practice 3 explains the CVE-2026-25253 in more detail.
Follow this update routine:
Check your installed version and update packages:
Run the built-in OpenClaw security audit after every update to catch configuration changes:
Review the audit output before restarting the gateway. Fix every warning the audit raises before moving to the next step. If it flags an issue, such as an open DM policy or an unauthenticated gateway, fix it before restarting. Restarting before fixing means the gateway will just come back up with the same problem.
If OpenClaw runs as a daemon, restart it after the audit comes back without issues:
The audit scans your setup to catch common security issues before an attacker does. It checks for the following issues:
Open DM policies.
Gateway running without authentication
Shell execution settings with too much access
Sandbox modes with the wrong configuration
The audit not only points out problems, but also tells you how to fix them right away. You can make changes without leaving the tool, which helps address setup issues in one go.
Practice 12: Monitor logs and audit skills quarterly
Once you deploy OpenClaw, watch what it does with the access it has on your system. Review logs and audit skills as a habit, not only when something bad happens. Security does not stop at setup, because risks can arise after deployment. Risk can come from later configuration changes, misuse, or new third-party skills. Log review and skill audits help maintain a strong security posture. They can help spot warning signs before it spreads in your system.
When reviewing logs, check for:
Unexpected access to sensitive files or paths.
Auth failures or repeated access attempts.
Unexpected outbound requests from the gateway.
New config changes or unexpected AI agent behavior.
After each review, audit your installed skills every quarter:
Remove skills you no longer use.
Recheck skills that received updates.
Check publisher accounts for ownership or activity changes.
Run OpenClaw security audit and treat warnings as serious issues.
Every core metric should appear in your logs, including normal activity. It should show both healthy activity and problems. If your logs show nothing at all, that is not a good sign. It means something is blocking your view of the agent's actions.
Conclusion: Security is a setup decision, not an afterthought
OpenClaw is a powerful tool for people who want to automate their work. Once you understand how it works, the security model becomes easier to manage. The 12 practices in this guide draw a clear boundary around your OpenClaw deployment. They outline what the agent can do, who can give it commands, what tasks it can perform, and how you can see any changes. These rules depend on how you set up your system and determine if OpenClaw stays safe or poses a security threat.
Issues arise when people rely on the default settings and don't bother to tweak anything. They think they're good to go once everything seems to be working fine. But by not making any changes, they leave their system vulnerable. Attackers can exploit these vulnerabilities, even when everything looks fine on the surface.
Based on experience, a better path is to treat setup as part of security from the start. Decide what the agent can access and block everything it does not need. Keep sensitive info out of reach and avoid sharing access across systems. Monitor activity and review logs to spot unusual behavior early. Doing these builds a strong security posture and helps you stay in control of your system.
To work through every layer of a secure OpenClaw setup, check out our dedicated installation guide. and, of course, the popular OpenClaw roadmap. Create a roadmap.sh account to follow the roadmap step by step, track what you complete, and keep your setup under control.
