Python Backend Development: Build Your First API
 William Imoh
You already know the basics of Python, like functions, classes, loops, and how to write simple programs. But moving into backend development means learning how real-world applications work behind the scenes, from server-side logic and data handling to databases and APIs. This is the stage where you shift from learning Python fundamentals to building real backend systems.
Python is one of the most popular programming languages to make that shift with. Its readable syntax makes the learning curve less steep, and its vast Python ecosystem gives you a wide range of mature, well-documented tools for modern web development. Frameworks like Django, Flask, and FastAPI make it easier to build everything from simple REST APIs to large-scale web applications.
In this guide, you'll learn what backend development means, how Python's main frameworks compare, and when to use each. You’ll also build a real backend application from scratch, gaining both the conceptual foundation and hands-on experience to build Python backends.
TL;DR
By the end of this guide, here's what you'll walk away with:
A clear understanding of how the client-server architecture works and where Python fits into it.
How to choose between
Django,Flask, andFastAPIbased on your project requirements.First-hand experience building a backend from scratch, complete with a database and a working API endpoint.
Knowledge of common beginner mistakes and the best practices to avoid them.
A solid foundation for continuing your journey in Python backend development.
What is Python backend development?
Python backend development is the process of building server-side systems that power web and mobile applications using Python. It involves handling incoming requests, applying business logic, interacting with databases, managing user authentication, and returning structured responses to users.
Anytime you log into an app, place an order, or load a feed, a backend is at work. Unlike frontend development, which focuses on what users see and interact with, backend development handles the internal mechanics that enable those interactions.
The table below shows how backend development compares to frontend development:
Aspect | Backend development | Frontend development |
|---|---|---|
Primary focus | Server-side logic and data processing | Visual interface and user interaction |
Business logic | Yes, handles core business logic | No, handles UI and presentation logic |
Database management | Yes | No |
User authentication / authorization | Yes | Partial |
API development | Yes | No |
Runtime environment | Server | Browser |
The client-server model
The client-server model is the foundational architecture of the web. It describes how two separate programs, a client and a server, communicate over a network. The client is the program that makes the request, such as a browser, a mobile app, or a command-line tool. The server is a program running on a remote machine that listens for those requests, processes them, and sends back a response. A server can run on various types of infrastructure, such as a cloud computing service, a Virtual Private Server (VPS), or a machine in a data center.
The client-server model flows like this:
A user submits a form in their browser.
The browser sends an HTTP request to the HTTP server. For example, it might send a
POST /tasksrequest with the form data.The backend receives the request, validates the data, saves it to a database, and returns a response, usually in JSON or HTML format.
The browser renders the response.
Every backend system, whether it powers a simple contact form or a large-scale application, operates around this model. As a Python backend developer, most of your work revolves around building and maintaining the server side of this interaction.
Core components of a Python backend
A Python backend comprises several important components that handle requests, store data, authenticate users, and keep services running in production.
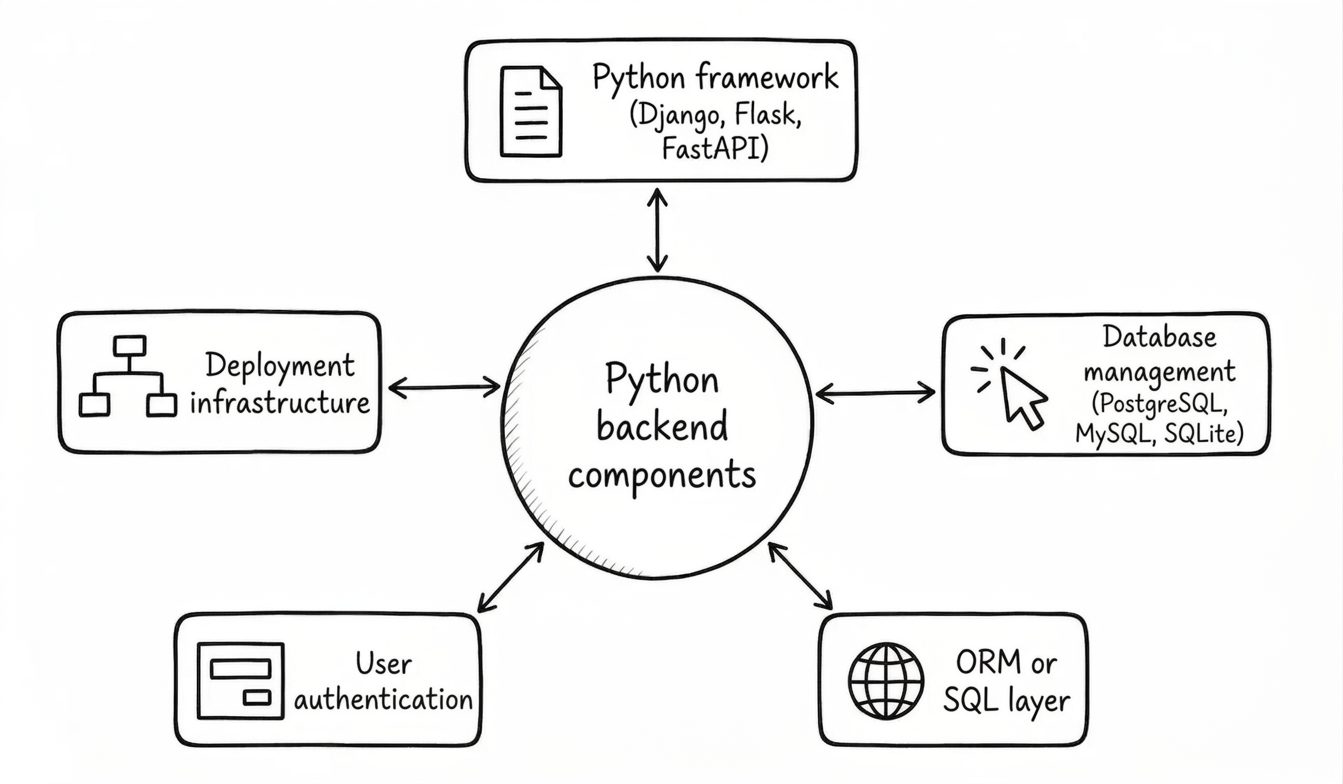
Some of the core parts include:
A Python framework for handling routing, request parsing, and response formatting.
Database management systems for storing and organizing persistent data, such as
PostgreSQL,MySQL, andSQLite.An ORM or SQL layer for interacting with the database from your Python code.
User authentication systems for verifying who is making requests.
Deployment infrastructure that keeps the application running in production, including servers, containers, and cloud services.
Choosing a Python backend framework
The framework you choose shapes how you structure your Python code, how fast you can build, and how your application scales. Across all major programming languages, frameworks exist to accelerate development, and Python is no exception. The following are the three major Python backend frameworks with their capabilities and best use cases.
Django
Django is a batteries-included, opinionated Python framework. It comes with most of the features web applications need out of the box. One of its standout features is its built-in admin panel, which makes tasks such as user and record management, permission assignments, and content uploads much easier.
Django's seamless integration with popular databases and third-party packages makes it a strong choice for teams that want rapid development without sacrificing structure. In my experience, Django is especially well suited to projects that prioritize maintainability and development speed, as it provides a solid foundation without requiring extensive setup.
Flask
Flask is a microframework that provides core backend tools, including routing and request and response handling. Unlike Django, Flask gives you the essentials, letting you choose additional libraries yourself. This makes it well-suited for small API endpoints and prototypes.
FastAPI
FastAPI is a framework that supports asynchronous programming, meaning it can handle a large number of concurrent connections efficiently. It also provides automatic documentation and request validation out of the box via OpenAPI and Pydantic, enabling developers to significantly reduce boilerplate code.
This makes FastAPI a strong choice for high-performance API development and microservices. It is especially useful for I/O-heavy applications, such as those that frequently call external APIs, query databases, or handle network requests.
If you want a detailed breakdown of the frameworks discussed, including when to choose each framework based on your project requirements, performance needs, and development experience, our Python backend frameworks guide is worth reading once you're done here.
Practical applications of Python backend development
Understanding where Python backends are used in the real world helps you see which skills matter most and what kinds of backend projects are worth building.
REST APIs for mobile and single-page applications
Most modern apps, whether on iOS, Android, or the web, are powered by a REST API running on the backend. The frontend development layer sends requests to API endpoints such as POST /orders or GET /users/42, and the backend returns JSON. Building efficient web applications this way keeps the frontend and backend cleanly separated, making systems easier to scale and maintain. The frameworks popularly used for such projects are Django REST Framework and FastAPI.
Microservices architectures
Large engineering teams often split their backend systems into smaller, independent services, with each service responsible for a specific domain such as users, payments, or notifications. These services can be deployed independently across multiple servers and run concurrently. FastAPI is particularly popular for building microservices because it’s lightweight, fast, and easy to deploy in containers.
Data processing and machine learning model serving
Python is widely used for backend systems that handle large-scale data processing, data analysis, and predictions. You can train models with tools like scikit-learn or PyTorch and expose them through API endpoints using frameworks such as FastAPI. This pattern is commonly known as ML model serving.
Beyond model serving, Python enables seamless integration of server-side logic, analytical workflows, and AI features within a single tech stack through its extensive ecosystem of data science and machine learning tools.
E-commerce and content platforms
Django’s built-in admin interface, ORM, and user authentication make it well-suited for content-heavy web applications such as e-commerce sites, news platforms, internal dashboards, and CMS-backed applications. These built-in features save development time by reducing the need for custom tools, enabling you to create robust, production-ready, and maintainable web applications more quickly. The community support behind Django also means there’s a vast collection of reusable packages for payments, search, and more.

Internal tools and admin dashboard
Backend frameworks are commonly used to build internal business tools such as inventory systems, reporting dashboards, management portals, and data review interfaces. These applications often require secure authentication, database management, and role-based access control, making frameworks such as Django and Flask well-suited for the task.
Building your first Python backend
So far, you’ve learned what Python backend development is, how backend systems work, and where they are commonly used. Now it’s time for you to learn how to build one from scratch by creating a minimal REST API with Django and Django REST Framework (DRF).
Before proceeding, it’s important to understand the difference between Django and DRF, especially since beginners often confuse how they relate to each other. Django is a backend framework for building web applications, while DRF is an extension built on top of Django that provides tools specifically for building REST APIs. DRF helps Django interact with frontend applications and other services via APIs. So, if you’re building something like a React frontend that communicates with a Django backend, DRF is a common and practical choice.
While the practical example uses Django, the core backend concepts, such as models, request handling, and database management, also apply to Flask and FastAPI, just with a different structure and syntax.
Below are the steps to get your first Python backend up and running:
Step 1: Set up your environment
Make sure your development environment is ready before writing any code.
Install Python
If you have Python already installed, skip this step. If you don’t, visit the official Python website, download the latest version installer, and run it.
To check if Python is installed and see which version you have, run:
Create a project folder and configure a virtual environment
To isolate your project’s dependencies from other Python projects on your machine, you need to create a virtual environment. Enter the following commands step by step to create a new project folder and create a virtual environment:
To activate the virtual environment (venv) you just created, run the following command based on your operating system.
For macOS/Linux, run:
source venv/bin/activateFor Windows, run:
venv\Scripts\activate
Install Django and Django REST Framework
Before you can build a backend API, you need to install Django and DRF into your virtual environment. To do this, run:
If pip prompts you to upgrade, do it before continuing so the install uses the latest packages.
Create a Django project and app
A Django project contains the application configuration, while app(s) help you organize different parts of your backend into reusable modules. To create a Django project and app, run:
This creates two things:
myproject/: the main project configurationapi/: the application where your backend logic and API code will live
Open the project in a code editor
Now that your project structure is in place, open it in your preferred code editor so you can start adding models, views, URLs, and API logic.
If you're using Visual Studio Code, make sure you are still in the myproject/ directory and run:
This opens the current project folder in VS Code.
Register your app and Django REST Framework
After creating your project and app, you need to register both DRF and your app to allow Django to recognize your app and load DRF’s API functionality. To do that, navigate to the myproject/settings.py and inside the INSTALLED_APPS insert them like this:
A common mistake I see beginners make is skipping this step. If you skip it, Django will not recognize your app’s models, views, or serializers. This can lead to import errors, missing database tables, or API endpoints that fail to work correctly.
Step 2: Create your first model and run migrations
A model is a Python class that represents a specific database table, with each class attribute mapping to a field in that table. It is the single, definitive source of truth for your data.
To create your first model, navigate to your api/models.py and add the following:
In this code:
from django.db import modelsimports the tools needed to build database schemas. Every model file needs this.class Task(models.Model)defines the new table namedTask, and inherits frommodels.Model.title = models.CharField(max_length=200)creates a column for text (like a “string”), and the maximum length limit of the characters is set to 200.done = models.BooleanField(default=False)creates a column for storing boolean values (True/False). The default value is set to False, which means new tasks will be “not done” by default.def __str__(self): return self.titleis a special method that tells Django, especially the admin panel, to display the actual title of the task (e.g., “Buy Milk”) instead of a generic label.
Running migrations
After creating or updating a model, Django needs to translate it into actual database changes. This is done through migrations. Migrations ensure data integrity by keeping your models and your database in sync. They are essentially a database version control system for your models.
First, generate the migration files by running:
This command detects changes in your models and generates migration files that contain instructions for updating the database.
Next, apply those changes to your database by running:
This command updates your database schema to match your models.
Without migrations, your database wouldn’t know about the Task model or any future changes you make to it. Always apply migrations to ensure data integrity.
Step 3: Configure your Django Admin
Now that your Task model has been migrated to the database, the next step is to make it visible inside Django’s admin panel. The Django admin is a built-in dashboard that lets you view, create, update, and delete database records without building a custom interface.
To register your model with the admin panel, navigate to api/admin.py and add:
In this code:
from .models import Taskadds the Task model you defined in yourmodels.pyfile.admin.site.register(Task)registers the Task model to the admin interface.
Next, create an admin account by running:
Django will prompt you to enter a username, email address, and password. After a successful creation of the super user, run the development server:
In your browser, enter http://127.0.0.1:8000/admin/ and log in with your credentials. You should see your API app with the Task table. Click on the Add Task button, fill in the fields, and save.

The Django admin is one of the fastest ways to confirm that your models, migrations, and database setup are working correctly before building API endpoints or frontend interfaces.
Step 4: Build your first API endpoint
Now that your model and database are set up, the next step is to expose your data through an API endpoint. In DRF, this typically involves three main pieces: a serializer, a view, and a URL. Together, these components enable your backend to retrieve data from the database, convert it to JSON, and expose it via an API endpoint.
Create a serializer
A serializer is responsible for converting Django model instances to JSON so they can be returned in an API response. It also handles automatic validation when data is sent to the backend. Django doesn’t automatically create a serializer file, so you need to create one manually.
Inside your api/ folder, create a new file called serializers.py and add:
In this code:
ModelSerializerautomatically generates serializer fields based on your Django model.model = Tasktell DRF to use the Task model.fieldsdefines which model fields should appear in the API response.
This means the TaskSerializer converts the Task object into JSON-friendly data that appears like this:
Create a view
A view contains the server-side logic that runs when a request hits your API endpoint. It decides what data should be retrieved, how it should be processed, and what response should be returned.
Open the api/views.py file and add:
In this code:
Task.objects.all()retrieves all tasks from the database.TaskSerializer(tasks, many=True)converts multiple task objects into JSON.Response(serializer.data)sends the serialized data back to the client as an API response.
The get() method runs whenever a client sends a GET request to this endpoint.
Create a URL route
A URL route connects an endpoint URL to a specific view. When a request reaches a particular URL, Django uses the route configuration to determine which view should handle that request. Django doesn’t automatically create an api/urls.py file, so you need to create it manually inside your api/ folder.
In the api/urls.py add:
In this code:
from django.urls import pathimports Django’s URL routing tool used to define endpoints paths.from .views import TaskListViewimports theTaskListViewclass from yourviews.pyfile so it can handle incoming requests.urlpatterns = [...]creates a list of URL patterns Django should monitor.path('tasks/', TaskListView.as_view(), name='task-list')tells Django to runTaskListViewwhenever a request is made to the/tasks/endpoint.
Next, you need to connect your app URLs to the main project URLs. To do that, open myproject/urls.py and update it:
In this code:
include('api.urls')imports all URL routes defined insideapi/urls.py.path('api', include('api.urls'))prefixes all routes from your app with/api/. This meanstasks/becomes/api/tasks/.
So when you make a request to http://127.0.0.1:8000/api/tasks/, Django forwards the request to TaskListView, which retrieves tasks from the database and returns them as JSON.
Make sure to run the server before entering the above stated URL. If everything is working correctly, you should see a Task list displayed in JSON format. This means your API endpoint is successfully connected to your database.

You can now create tasks through the Django admin panel, and they’ll automatically appear in the API response.
Step 5: Add user authentication
Django includes a complete user authentication system with sessions, password hashing, and user management, without requiring any third-party libraries. For APIs, DRF’s TokenAuthentication is a common standard starting point, and it integrates with Django's built-in authentication system and user model. You can also add multi-factor authentication for sensitive endpoints where stronger identity verification is required.
To secure the API endpoint you created from the previous step, follow these steps:
Register the token app and run migrations
In myproject/settings.py, add rest_framework.authtoken to INSTALLED_APPS:
Then run migrations to create the token table and run the server.
Generate a token for your user
Go to http://127.0.0.1:8000/admin/ and log in. Under the Auth Token section, you’ll see Tokens, click Add, select your user, and save. Your generated token will appear in the list. Copy it, as you will need it in the next step.

Protect your API endpoint
Update api/views.py to require a valid token on every request:
Test your API endpoint
Now any GET request to http://127.0.0.1:8000/api/tasks/ without a valid token returns a 401 Unauthorized status. Do not panic, this is actually a good sign—it shows that your endpoint is now protected and rejects requests that don’t include a token.

To make an authenticated request, you need API Client tools like Postman, Thunder Client, and Insomnia. In Thunder Client:
Create a new
GETrequest, and enter the URLhttp://127.0.0.1:8000/api/tasks/.Click the Headers tab.
Add
Authorizationas the header andToken <your-token-key>as the value. DRF's Token Authorization always expects the token to be prefixed withToken.Click Send.

You should now see your task list returned as JSON. With that, you have a working, protected API endpoint. Token authentication is the one example of how authentication operates in any backend system, regardless of the method used. You can explore how to implement JSON Web Token authentication for DRF, which is a common approach for browser-based frontend or API setups.
Step 6: Structure your project
Django uses an app-based structure for its projects. Each app is a self-contained module responsible for a specific part of your application. As your Django project grows, this separation keeps the codebase maintainable and makes it easier for teams to work on different parts of the application in parallel.
A well-structured project also simplifies the deployment process by making it easier to containerize the application and manage environment-specific settings for development, staging, and production.
Here’s what a clean DRF project looks like—this is also the structure you should have if you followed the steps until this point:
When you start working on production-ready applications, split settings.py into environment-specific files such as local.py and production.py. Also, move sensitive information into a special file called .env. This file can contain Django secrets, URLS, ports, hostnames, feature flags, API tokens, and deployment environment names.
Common errors to watch out for
As you build backend applications, you’ll inevitably run into configuration mistakes, migration issues, and debugging challenges. Understanding some common backend errors and best practices early on can save you hours of confusion and help you build more reliable applications.
Not using virtual environments: Installing packages globally with
pip installcan create dependency conflicts between projects. Always create a separate virtual environment for each project to isolate dependencies and maintain a clean development setup. With this, you’re preventing many avoidable issues you might face later on.Forgetting to run migrations after model changes: Skipping the migration step often leads to database mismatch errors such as
OperationalError. This happens because when you modify a model, Django doesn’t automatically update your database schema until you run the makemigrations and migrate commands.Forgetting to register apps in INSTALLED_APPS: If your app isn’t added to your
INSTALLED_APPSlist, Django will not recognize the models or application configuration. Always add every app so your application configurations load correctly and your backend behaves as it should.Returning raw querysets instead of serialized data: Django querysets are Python objects, so DRF serializers are needed to convert them into JSON responses. In DRF, you should always pass database results through a serializer before returning them in an API response. This ensures consistent API formatting and enables proper automatic data validation.
Storing secrets directly in code: Hardcoding API keys, database credentials, or secret keys inside
settings.pyexposes your application to data breaches. Instead, store secrets in an environment variables file.Unhandled exceptions and incorrect status codes: Your API should return appropriate HTTP status codes so clients can correctly understand the outcome of a request. Robust error handling is one of the marks of a good backend application.
Common status codes include:
Status Code | Meaning |
|---|---|
400 | Bad request or invalid input |
401 | Unauthenticated request |
403 | Forbidden access |
404 | Unfound resource |
500 | Internal server error |
Here’s how to explicitly label status codes in your API:
Best practices to keep in mind
Use Django’s built-in authentication tools
Django and DRF each provide authentication mechanisms suited to different uses cases. Django provides session authentication out of the box, while DRF adds token-based authentication. For JSON Web Token authentication, a popular third-party package like djangorestframework-simplejwt integrates seamlessly with DRF. Using these established tools is safer and more maintainable than building your own from scratch, helping you build secure web applications more efficiently.
Write tests for your API endpoints
Writing tests ensures your backend continues to function correctly as you add new features or make changes over time. Tests act as a safety check that verifies your API endpoints return the expected responses after updates. They also make debugging easier because you can quickly identify when and where something went wrong.
Manage environment configuration properly
Manage your environment variables through .env files using tools like django-environ or python-decouple. This helps you keep sensitive values secure, separate configuration from application code, and simplify development across environments.
Structure projects with separation of concerns
As projects grow, organizing apps by logical domains helps keep code maintainable and easier to navigate. For example, in an Electronic Medical Records system, you might need to create separate apps for different domains such as patients, encounters, clerking, and consultations. Also, always keep the virtual environment at the project level instead of random directories. Separating concerns becomes even more valuable when multiple Python developers start working on the same codebase.
Optimize database queries
Query optimization is a critical skill for backend developers working on production-level applications. Poor database queries can slow down your application significantly as data and traffic increases. Django provides tools like select_related() and prefetch_related() to reduce unnecessary database queries. You can also use packages like pip install django-debug-toolbar to inspect query performance during development.
Protect against Cross-Site Scripting (XSS)
Django automatically escapes template output by default, which helps reduce the risk of XSS attacks by preventing user input from being executed as code in templates.
For APIs:
Validate incoming data using serializers.
Clean untrusted input when necessary, especially user-generated HTML or text.
Avoid rendering unsafe user-generated HTML directly.
Write clean code that can scale
As your backend grows, maintaining clean architecture and modular code become increasingly important, because it makes your application easier to understand, extend, and debug. Depending on your needs, you may extend your application to support asynchronous processing, higher concurrency, or real-time features. Tools like Django, FastAPI, and Django Channels help you implement these capabilities and build scalable web applications.
What comes next
You now understand the fundamentals of backend development, how Python’s major frameworks fit into different use cases, and the common mistakes to avoid and best practices to apply when building backend systems. Most importantly, you’ve gone from theoretical knowledge to practice by building your first Python backend and exposing a working REST API using Django and Django REST Framework.
This is just the starting point. Continue building with our structured Python roadmap, which covers the core Python backend topics in a progressive way to keep your learning on track. After that, you can explore our broader backend roadmap for a full picture of backend development. If you haven't already, create a roadmap.sh account to track your progress, save your learning paths, and access personalized roadmaps as you advance through your tech journey.
